Wednesday, 8 October 2014

Day 2, breakfast twice in the same week!

Yes, you read right. I have had breakfast two days in a row. Not something that should be a report-able event but it is in my world. I never eat breakfast. My daughter is has been eating breakfast too and she is reporting a much happier tummy. Less acidic and an increased appetite.

This isn't what I ate...but it sure looks a heck of a lot better! Similar ingredient different presentation. What a difference that makes.

Yesterday I had a frozen banana smoothie, Today banana and cinnamon on toast. Both days I have had a coffee straight away and today I feel a bit gassy but yesterday I didn't. I wonder if it's the fact that my smoothing was super-chilled yesterday and although my teeth didn't like it much my stomach did. I am learning to listen to what my body is saying, it could take me a while as I have been ignoring it for years!

I intend on trying this recipe today which I found here.  Doesn't it look amazing?
Basil Chive Cucumber & Corn Salad ~ Sumptuous Spoonfuls #cucumber #corn #basil #salad #recipe
I don't have all the herbs so it's not going to be an exact copy but the essence of if it is the same. Healthy, clean and anti-inflammatory. It's sure going to make the brown-rice wafers I am having with it look a whole lot better! My allowance of  bread is 2 slices a day due to the cost of gluten free bread and I ate them at breakfast...its not all that hard to see how I failed to optimise my diet in the past. I was happy just to whack some cheese on my crackers and quiet the hungry growl with another cup of coffee.

My bad!


Monday, 6 October 2014

Ole Mother Hubbard is revamping her cupboard...

Ole Mother Hubbard is revamping her cupboard! Seriously, despite having a gluten and lactose free diet I am still having stomach issues. I've also cut down a 10+ a day coffee habit to half that and quit smoking. I rarely drink alcohol.I should be at the top of my game. But I am not. I am anemic to the point of having heart palpitations and extreme exhaustion. My stomach hurts and my bowel...well you don't want to know,
I've often wondered what more I could cut out and still have something to eat.

BUT in truth, I have been in denial. So here is my truth
.


My typical days food- Breakfast- Nothing. Lunch brown rice crackers with cheese. Afternoon tea, the same thing or some gluten free baking or potato chips if there was some. Prunes or dates, Dinner, Healthy enough if it was gluten and lactose free, Not always the case as I am the only one with these dietary needs and cooking two meals is sometimes not a priority. On these nights I had a few hash browns, or  just the spud from their meal..with cheese.
I don't drink enough water, in fact I drink about 1 cup a day,,,unless it also contains my friend Mr.Coffee.
I don't eat enough fruit..I eat prunes, dates and bananas and apples now and then. Pineapple if there is some left in the tin after making pizza. Citrus never, Berries never...I am not good with fruit.
Fish, If it's tinned in tomato and basil does it still count?
I eat cheese, lots of it. Cheddar or mild. Off the block,in my salad and on my crackers. Cheese became my calcium source when I went lactose free and I put it on or with anything cheese goes with.
Her'e's my question. I am not stupid...so why do I eat stupid??

I have been lactose free for 8 years, gluten free for 9,5 years. I have adapted by diet but not really optimized. Before my allergies I ate well, filled rolls,weetbix and milk etc etc, I couldn't understand why I was tired, sick and sore until I worked out it was the food that was doing it.

I started 2014 with a stack of health and fitness magazines, new lunch containers and drink bottle, new sneakers and a pushbike and a resolve...I will be healthier and less tired. I will eat and exercise for energy. It wasn't about loosing weight or getting fit. I just wanted to sleep when I should and feel better, So what happened?
The first thing that happened was I started putting on weight..huh?? I halved my sugar intake by halving my coffee (with 2 sugars) intake. I ate breakfast instead of skipping it and thus slowing down my metabolism. I snacked on nuts, dried fruits and drank orange juice...
At first decided a little weight gain was ok, it made sense my body would have to adjust to my new lifestyle but slowly I realised I did care, I had issues with it and decided the nuts and dried fruits must be to blame.

The second thing that happened was a change in our circumstances financially. Big changes, Suddenly the money saved by not smoking had to be spent on paying bills not healthy foods and swimming sessions. Not inspiring magazines,

The third thing that happened was loosing the internet. First my computer died, then my daughter ipad got stolen and finally our internet was an expense we couldn't afford....so no pinterest, no blog not Mr Google to inspire, inform and encourage.

So what happened? I reverted to uninspiring meals Skipping breakfast, not swimming or cycling.
I didn't achieve my goal of eating better, having more energy and sleeping better. I accepted that quitting smoking and drinking less coffee was enough of an achievement. Once again I adapted but didn't optimize. I got out what I put in.
But guess what? I am worth the extra effort it requires for me to be healthy. I am going optimize, to reach my goal but take a different path, There is not one way to get there. I am worth it...and if you are reading this ticking off boxes and nodding your head that I am making sense, that my truth it actually your truth too then please join me on this road. Follow my posts, share my thoughts, ideas and jump on in. You Are Worth it Too.


Saturday, 20 September 2014

NOT bored to tears these holidays....part 2.

Boy Quote Print Chevron Wall Art - Boy a Noise With Dirt On It Noun Text Print - Kids Wall Art Print, OrangeBrown Grey White Color 8x10 inch

This is part 2 of my NOT bored to tears holiday plan. As I said in my 1st post on this I have 3 teens, who lucky for me still want to spend time with Mum.
I find it a challenge to find things to do that are both teenage and pocket friendly so I have been searching the corners of the web to find super cool memory-making activities for us to do.

Now added to my bucket list…

I am going to take this one step further...ditch the canvas and throw them at each other! I will use a water-based paint as well.

5 DiY to Try this Weekend: Playing with Birds
There are 5 cool bird ideas on this website I think we will be doing both the puppet above and the oscillating woodpecker.

Easy to make. Pipe cleaners and beads!
These will be cool to make during the holidays and put aside for our NOT Halloween activities. I think my son will overcome his craft-phobia to make spiders.
Craft idea for Charlie's holiday party at school- silver pipe cleaners with clear and blue beads
While the beads and pipe cleaners are out these look ....like they will be fun to make too! DIY lesson found here.


I am soooo looking forward to these holidays! Our local area also has a free trolley derby event, free nature reserve talk, free teen-wrtiers workshop and of course there is fishing, hiking and swimming. (Indoors...it;s spring not summer!)

Sunday, 14 September 2014

Geometry Fun Week

 An octagonal prism. Psssst....It's not the shape we intended to make but at least we learnt a new shape:) Below is the form you may have seen this shape in before. Now that would be one way to bring a reluctant young lady into a geometry lesson...make it pretty!

 
Lucky for me, my young lady isn't reluctant and we both enjoyed having a second go at making an isosaheadron.


In total there are 20 triangles. We used string threaded through them to join them at one corner. (3 straw lengths+1 string) it's a lot quicker to suck up the string than thread it like a bead but it's not for everyone! A bit like sucking up lint covered spaghetti but it gets the job done!

 Laying the triangles out into it's net shape was HUGELY helpful. Seriously, it made it so much easier.
 Once all the triangle were made into diamonds they were joined together into the net form. It was easy to join the 2 ends together and then each of the top triangles.

How cool is this 20 faced shape more formally known as a tetrahedron?

And as a bonus it can be recycled with the plastics later on.
Loving that!

NOT bored to tears...spring time school holidays. Part 1


I have teenagers. 3 of them. I am lucky that they still want to spend time with me but I find it a challenge to find things that are both teenage and pocket friendly! I also have to factor in the fact that I have 2 daughters and a son and that my eldest has cerebral palsy. As a result she is limited in what she can do.

THANK GOODNESS for Pinterest and the kind hearts who have shared so many inspiring ideas. 

 As all the ideas lead to other links I will only post them 3 at a time. After all no-one has all day and endless coffees to read posts with.

 Sharpie art. Drawing on plates or cups with a sharpie.  This idea has been on my agenda for ever! 

I know the girls will like this one but I think my son could be coaxed into it...maybe. I guess it depends on how ridiculous he can make them. He does have a reputation to uphold after all, 
ATC Animals

Tic Tac Toe...winner eats all! This one will be a hit I am sure.
Tic tac toe valentines: These are so cute and incorporate a little candy without drowning them in sugar.

Enjoy and have fun! Every moment we spend with our teen is the opportunity to strengthen bonds, navigate the often murky waters of teenage-dom and make memories.  Hoorah for the holidays when it can be all about fun!


Friday, 5 September 2014

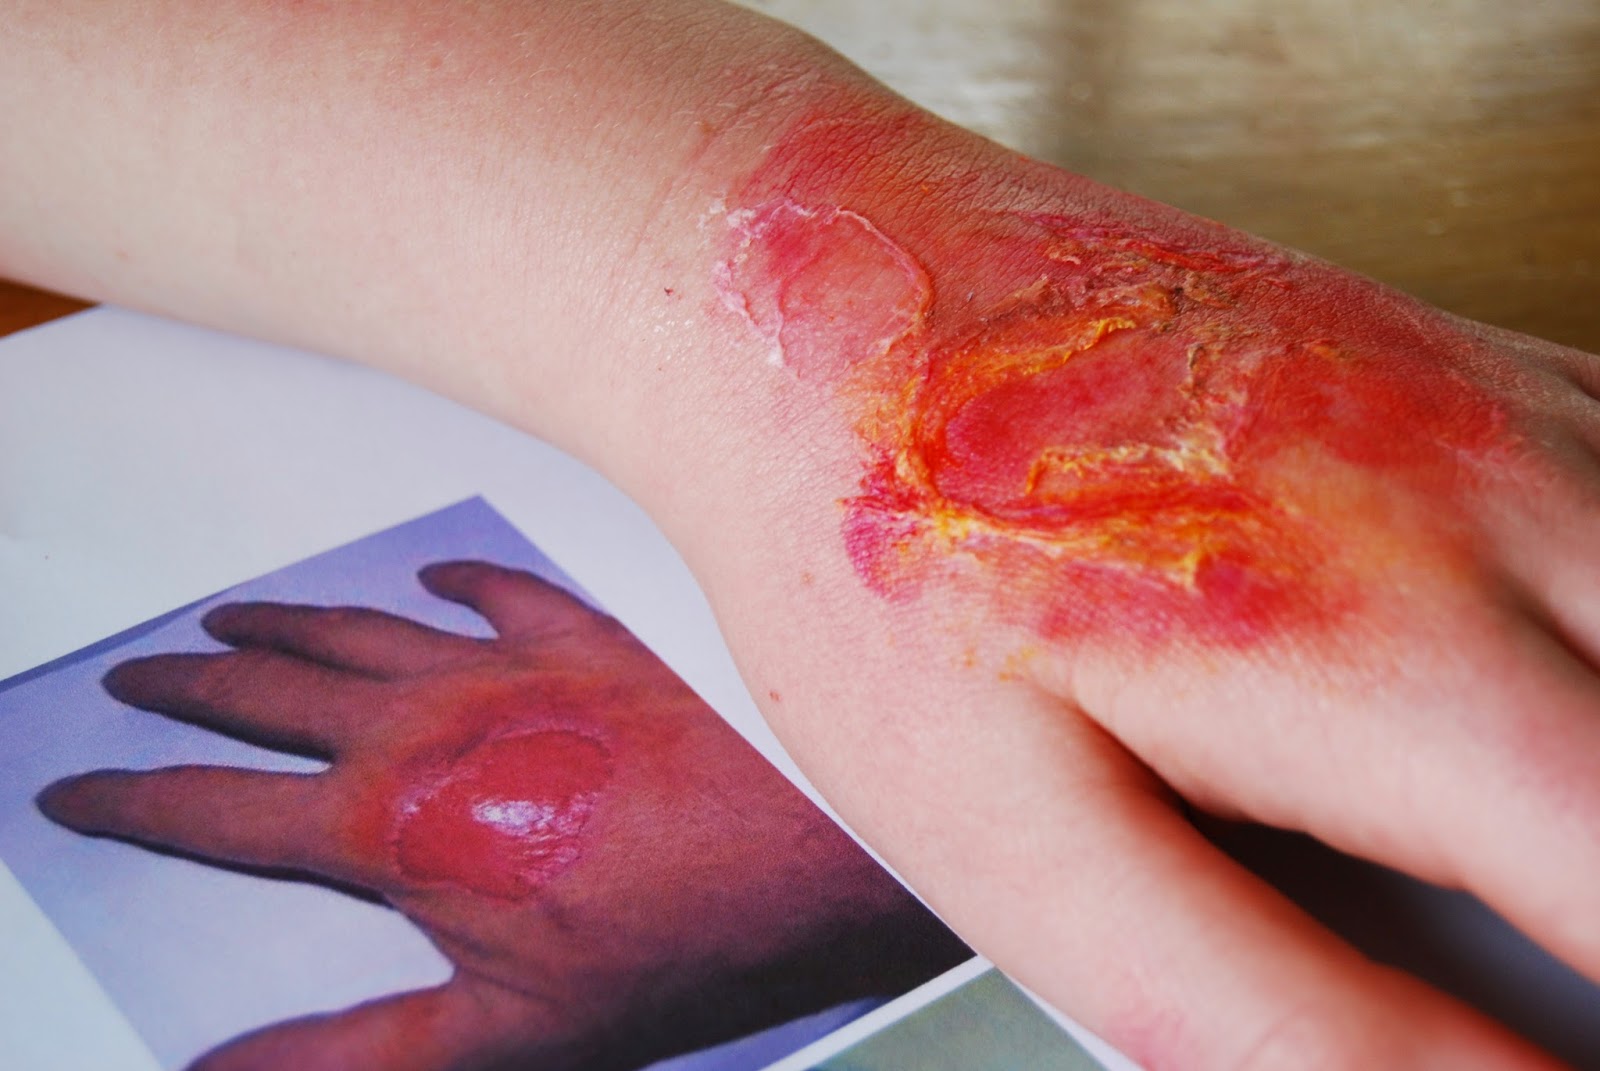
Casualty Simulation. CAS-SIM. Dry-Look Fake Burn TUTORIAL

This is my second burn tutorial. I hope you will enjoy it!

 The first step for creating my dry looking burn was to 'paint' the back of my hand with PVA. As soon as it was dry I peeled it off and saved if to use later. Peeling it off wasn't the most pleasant experience but the results are worth it!
 I created the base by using cheap lipstick, eye shaddow and food colouring mixed into moisturiser. The moisturiser helps the colour to take to your skin as well as to blend it and adjust the colour. It was simple enough, just keep playing around until it looks the way you want it.
 Take the dried PVA 'skin' and place it over the top of the burn, continue to build up the colour over the PVA. If you have trouble making the dry PVA stick dab a little extra glue around the edges.

Supplies: PVA (also known as white glue, Elmers glue and craft glue) 
Make up in selected colours and moisturiser. I found it easier to blend the base with the brush but I dabbed the final layer on with my fingers.


Wet look burn tutorial also on this blog.

Till next time....
Lisa

Thursday, 4 September 2014

CAS-SIM Casualty Simulation. Wet look burn TUTORIAL.

Hi all, welcome to my blog. If you recognise  my blog name it's most likely because you've kindly visited me before...I have somehow gotten locked out of my blog so I created another under a similar name. 

I hope you enjoy my fake burn tutorial, I am new to the art of creating fake wounds but one thing I can tell you is...this is highly addictive! You have been warned :)

 Standard baking supplies...food colouring and gelatin. Just add imagination:)

 Using food colouring mixed with unset food colouring I created a base to build the rest of my burn on. I allowed it to dry on my skin  and then applied PVA glue over top. The glue is used to build up the burn and also to peel away in places later, like blistered skin.
 Once the PVA dried I applied gelatin in blob-like patches. I used more yellow than red to created the weeping look. This is not for the faint hearted or weak stomached! 

I peeled away the dried glue in places and then added lipstick to deepen the red burn. The while burn was then dabbed with the unset gelatin mix, resulting in a wet looking burn and blistered 'skin' from  around the edges of the PVA.

PVA glue is also known as white glue, school glue, craft glue and Elmers glue.
Also found on this blog...dry burn tutorial.